There are many, many things that could be easier in life, if only there was the time to "do something about it". I mean really. Just look around where you are right now. You probably see dozens of things that could be better "if only". Right? But we must pick our battles.
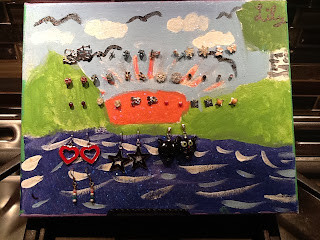
This project certainly isn't anyone's biggest area of concern - but it was very fun and looks great. It was born of a "clean your room" assignment that went off course. That said, this project ended up being a great three-for-one deal for both of us. It was a craft (which she loves), it was time spent with Mom (important) and it solved the dilemma of what to do with all those little earrings.
The inspiration for this fix was actually my 9 year old's original idea. She was keeping her earrings on a sheet of paper, hung on her closet door. So organized, right? I like to think the apple doesn't fall far from the tree, but you should see the rest of her room! Ugh! But I digress and support the positive here.
 |
| Her original earring holder. Cute, huh? She even used the label maker at the top... |
I liked her idea but knew it needed improvement (it was paper, after all).
Here is the project:
Step one - purchase an unpainted canvas from craft supply store (we went to Michaels)*. Anything smaller than an 8x10 will be too small. There are many choices in the painters area - the most inexpensive one will do.
Step two - allow your daughter to draw (with pencil) a picture on the canvas.
Step three - the fun part! Let your daughter paint it. You'll want her to use acrylic craft paint. It is inexpensive and comes in a million colors including metallics and glitter. Buy several - keep them for other projects. Don't forget to paint the sides of the canvas! It won't be going in a frame and you want it to look nice on the edges!
 |
| "Sunset" - a Lily original. |
 |
| Use all the available space. Then it will be ready to go as your daughter collects more earrings as she grows. |
Step five - again, for the adult. Take a hand sewing needle (the biggest one you have) and pop a hole through the canvas at each mark. It should pop through pretty easily. If it doesn't, try another needle - yours may be dull.
Finished! The first time you put earrings through, you may notice that they require a little effort to push through. I'm sure the earring posts are a little thicker than your needle. The earrings will stretch out the hole and it will be easier next time.
For ease of use, you'll want a small easel to hold your earring masterpiece**. These are sold many places, including office supply stores. They are inexpensive - I actually already had one on hand.
When finished, you will have a customized piece of functional art and your daughter will think you are SO FUN and pretty smart, too!
 |
| The finished product. There are many more available holes than she is using right now - room to add on! |
Notes:
* If you find yourself at Michaels Crafts regularly, then you probably already know that they ALWAYS have a 40% off coupon available - usually in the mail or the Sunday newspaper. If you are like me, you normally forget it at home or it has expired. Michaels Crafts has an App for your smartphone that has the current coupon on it - scanable at the register. Yes, there is an app for everything now - but this one is one I'll use and save good money with.
** These inexpensive easels are also great for holding an iPad. You don't need something expensive! I use one in the kitchen with mine.

Cute. Great thing you've come up for such a wonderful idea, very lovely.
ReplyDeletescrew back earrings