Wednesday, September 18, 2013

Baking for your family - healthier, faster, easier.


Tamara Nugteren


If this looks familiar, it is because this is an updated and expanded version of a previous post.  Please enjoy both versions!

I love to bake.  This works nicely with my desire to feed my family and myself in a healthy way, because I can choose the ingredients in my recipes. I can also tailor my recipes to be dairy-free, for my daughter.  But, time is also a premium when you have young children, so how can I best do both of these things when baking from scratch takes time?  No point in arguing it – baking from scratch is definitely slower than buying pre-made items or even whipping up a box mix or using premade dough for your favorite goodies.  But, just because it takes more time doesn’t mean you can’t do it – and there are lots of ways to be more efficient and make your extra work last longer.

Here are a few of my favorite time saving tips for baking:

Dedicate a cabinet to baking supplies.
When possible, keep everything to do with baking all in one spot in your kitchen.
In my kitchen, I keep all the dry ingredients (flours, sugars, baking powder, baking soda, salt, chocolate chips.), oils, cookie cutters, measuring cups, muffin cups and seasonings together.  If space allows, keep your mixing bowls there as well.   It’s a one stop shop.

Whenever you bake something, make extra.
Whenever I’m able to set aside some time for baking, I make sure I have enough ingredients on hand to make several batches.  This works really well for all sorts of baked dishes.  Everything from muffins to lasagna.  If you are going to go through the work, why not make two or three batches?  It takes almost no extra time if you have all the ingredients out anyway.

For entrĂ©es, you can usually make the entire recipe up until the bake point, like with a lasagna.   Just cover the uncooked dish with foil, write the bake time on top with a permanent marker and freeze.   Ever freeze extra soup?  No?? Oh, you have to try that.  Anything without noodles works great (the noodles get mushy…).

Home-baked cookies are THE BEST, but having an entire batch of cookies in the house is just trouble.  I personally, have very little self-control.  If I’m not feeding a large group, it’s best for my waistline to bake only a few at a time.  The best way to accomplish this is to make my own cookie dough rounds – just like you can get in the refrigerator section (except better of course!) and freeze them.   It’s so easy – you’ll wish you had done it earlier.  Start with a double batch of dough.  (Consider dividing it up into three or even four portions and flavoring each differently.  Some chocolate chip, some white chocolate macadamia nut, some M&M – whatever you like. )  Then, take a dough scoop or a couple of spoons and plop the dough down onto a cookie sheet lined with wax paper.  You can put them pretty close together since they won’t spread.  Put the cookie sheet in the freezer until the dough is frozen.  Pull them off and drop them all into a gallon sized freezer bag and re-freeze.  Make sure to write the bake instructions on the outside of the bag.  Then, whenever the mood strikes, you can bake just a couple at a time.  Or several different varieties so that everyone gets their favorite!


The kitchen tip that I use by far the most is making homemade baking “mixes”. 
A baking mix is just the recipe’s dry ingredients – premeasured and stored together.   Anyone can do that! Muffins, waffles, pancakes, scones, breads… the list goes on and on.  
For example: Find a great homemade muffin mix you love.  Measure out the dry ingredients for one recipe in a mixing bowl and two more into quart-sized storage bags. Either print-up and insert the recipe inside the bags, or write it on the outside with a permanent marker.  Remove all the air, seal it shut and put it in your pantry. Next time you want muffins, you have half the recipe already done.  Go on to finish out the recipe in the bowl.  If the recipe makes a particularly large batch, I always freeze at least half of the finished muffins in an airtight container.  Double time savings!  Some extra muffins for later and some extra muffin mixes for WAY LATER! (My family just can’t eat two dozen muffins as fast as we can two dozen cookies!)

There are so many make-ahead possibilities.  The savings are in both time and money – and of course no un-pronounceable ingredients is a great bonus. 

View this link: My Favorite Bell Pepper Recipes for recipes for Roasted Red Pepper Hummus and Veggie Packed Savory Meatloaf.  Both of which freeze well.

Check back soon - my next few posts will be some of my favorite fall recipes, all of which are perfect for making extras for later.  Homemade Tomato Basil Soup (for my garden's bountiful tomato harvest!) and the best, EASY rosemary bread recipe will be first.  Shortly following will be two of my favorite muffin recipes - Pumpkin Chocolate Chip and Chocolate Zucchinni (both of which also happen to be dairy free.) Yum!  Happy baking!


Tuesday, August 6, 2013

Chores - "because you live here" or for allowance?

Tamara Nugteren


If you read my previous post, then you already know our kids have recently started getting allowances. And hopefully you also noticed that they are EARNING it.  So, what exactly qualifies as a chore that you have to do "because you live here" and what is a chore that can bring in extra income?

For our two, up until this summer, ALL chores were done "because you live here" and because "everyone has to help out".  They have been doing some sort of chore since they were preschoolers.  Alas, that could only last so long.  The aforementioned need for the children to learn money management skills and my need for more output with less fuss has led us here.

So, now the chores that are done "because you live here" are as follows:
- Make your bed and keep your room mostly clean (no clothes on the floor).
- Put away the clean laundry that I deliver to your room.
- Feed the dog and take him on walks.
- Practice piano.

The chores that are done for allowance are more varied.  The 9 year old and the 11 year old can really accomplish all the same tasks for now.  They have one chore each day.  It's written down so they can go look and do it anytime of the day.  My goal was to get them to do things that teach them a housekeeping skill and get them to do things that I find tedious and time sucking (but don't tell them that). Before you read this, I must give you the caveat, DONT JUDGE ME.  I know some of you have children that do WAY MORE and some of you have children who DO NOTHING.  I'm trying to hit the middle ground with room to grow.  The following list is revolving, meaning we update it and change it around a few times a year.

Our nine-year-old's current list:
- Monday: Sort vitamins.  She lays out the variety of calciums and multivitamins that each person is supposed to be taking for the week (This is one of the tedious ones...).
- Tuesday: Put away all the clean dishes for the day or empty the dishwasher.
- Wednesday: Dust the main living areas.
- Thursday: Shake out rugs in the bathrooms and the kitchen.
- Friday: Clean surfaces in the main bathroom (counter top, switches, knobs, etc.)
- Saturday: Clean bedroom.

Our eleven-year-old's current list:
- Monday:  Shake out rugs in the bathrooms and the kitchen.
- Tuesday: Vacuum the rug by the front door.
- Wednesday: Wipe down the stainless steel appliances.
- Thursday: Take the trash and the recycling to the curb.
- Friday: Take the trash and the recycling back up to the house.
- Saturday: Clean bedroom.

Other past chores have been helping with the various stages of laundry (folding, sorting, hanging and even running the machines), blowing out the garage, sweeping the kitchen floor and others I can't recall.

On any particular day, if a chore doesn't get done, that percentage of allowance gets deducted from the end of the week payout.  There is a little wiggle room here - I've said that if it doesn't get done because they are really busy, they could do it the next day.  However, if it is a pattern of behavior, it's a "too bad, so sad" scenario.  Truthfully, it hasn't happened yet and we are at the start of month three.  They are very motivated to get the paycheck, and I haven't had to beg-plead-nag for them to do the chores.  Its been great.

Another real world financial situation will come to light this weekend.  The kids have been at their grandparent's farm this week.  There will be no allowance because I was doing the chores.  In our house, vacation time is unpaid.  A good lesson to learn, I think.  We also now have one child actively seeking out additional chores for a little extra cash toward the item she is saving for.   Nice.

I'd love to hear how others have worked out the whole allowance thing...

Friday, July 5, 2013

Money Management 101 - Kids edition


Tamara Nugteren


Its finally time. 
Our kids need to learn some good solid money habits before it’s too late. We’ve been putting it off all school year. 
Waiting for time. 
I guess I can take joy in the fact that it coincides nicely with our new “summer chores” list.   A nice two-for-one deal, if you will. 

A little back story to start this.  My husband and I have an 11 year-old son who is a saver and a 9 year old daughter who spends every last cent she gets.  Wildly different in every way, but they both need money practice before we send them off into the world by themselves.    We also really want them to learn to take responsibility for the things they own AND know how to do things around the house – hence the chores. I know many a college student who racked up thousands of dollars of credit card debt because they had no concept of money when they left home.   We parents need to step it up.

Our children have been doing age appropriate chores since at least kindergarten. They make their beds (begrudgingly), pick up their rooms and have had an additional “chore list”.  We have always told them that they need to do a few things “because they live here, too.”  Which I think is perfectly appropriate. But before this summer, they have never had an allowance.    The time is here. 

Because the children were whining frequently about their chores, I knew it was time for the seasonal change out.  We needed new chore options for the summer (more on that later...).  To add in the aforementioned “Money 101” class AND stifle the whining and nagging we decided to add in an allowance.   I have to say, 3 weeks in, it’s working.  Chores are getting done each day without (much) complaint and they are starting to learn to divide up their money.  Here is how we decided to do the allowance management in our house.

First, we needed new piggy banks.  I wanted the kind with three slots – one for save, one for give and one for spend.  I looked online and was unhappy with the choices.  Pretty expensive (sort of defeats the purpose of the lesson) and they were really plain.   So instead I just borrowed the concept and we made our own.  See below for instructions.

Then we decided on how to divide up the allowance each week.  This was not a popular decision, but again, it’s a lesson.  In our house, the kids put 20% of their allowance into the “save” jar, 20% into the “give” jar (split between our church and a charity of their choice) and 60% into the “spend” jar.  Every few months we will go to the bank to deposit the “save” money and we will donate the “give” money*. 

Now, thanks to the immediately divided allowances, it’s easy for each child to tell exactly how much money they have, and how much they still need to earn to get whatever it is they desire.  They can also take a peek at their savings accounts online via the bank’s website and watch their savings grow.  Last, they are learning to save first and hopefully they will get some joy out of choosing how to donate their “give” money.  Money management is too important to neglect.

* One child feels passionate about the humane society at the moment.  The other needs a more “active” donation, so we are going to introduce him to www.Kiva.org, an organization that allows regular people to lend small loans to people in impoverished countries. 


Multi-Sort Piggy Banks - two versions. 
We took two different, but similar routes to make our homemade multi-sort piggy banks.  Something for everyone.  One of the methods is really nice looking and one is cute and durable.  One of our children takes after me and has a severe case of "drop-sy", our nickname for the inability to hang on to anything to keep it from falling to the ground. No, it's not a really condition, but we try not to give her things that break.  :-)

Our daughter's bank is quick and easy.  I used three plastic jars leftover from some Dole peaches and pineapples I had on hand.  I asked my husband to cut the slots in the lids with a box cutter (it was easier for him to do...).  Then our daughter wrapped her choice of duct tape around all three.  Last, she labeled each jar "give", "spend" or "save".  Done.


Our son got a more sophisticated piggy bank look.  I'd love to say it's because he is more sophisticated, but really it's just because I think this version is way better and I couldn't let our daughter have glass.  But I digress...
For his banks, he chose three different paint colors from leftovers we had on hand.  One is his bedroom paint, the other two are from other projects.  For each color, I poured some paint into a ball jar and rolled it around until it covered the jar.  Then I poured as much out as I could back into the can.  Last, I inverted the jar into a big red plastic Solo cup and let it continue to drip out overnight.  By the next morning it was beautiful.  It took another 24 hours to fully dry.  We decided not to bother with slots in the lids on these.  Just twist off the lids for use.  Also labeled with "give", "spend" or "save".


Next post - the chores that earn the allowances.  Have a great weekend.


Monday, June 17, 2013

Empty Nesters.

Tamara Nugteren


Well, it's official ~ Francine and Alberto are empty nesters.

Jay and Daisy left the nest sometime this morning (Saturday) at 17 days old.  I was hoping to see them go, but it wasn't meant to be.  I could tell that it would be anytime now and we have been watching them every chance we get from our kitchen window.
For the last two days they have been actively walking around in their nest, fluffing their feathers and looking out.  (Prior to that they did nothing.)  Francine and Alberto have also been loudly encouraging them them to fly during this time.  They were frequently flying up to and around the nest - it was pretty cool to watch.

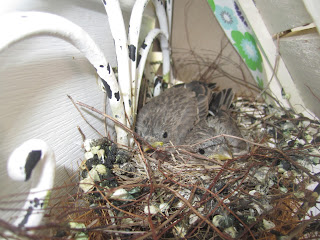
Close up of Jay and Daisy at 16 days old.
Almost ready to leave!

Jay and Daisy, as viewed through our kitchen
window - a little grainy due to the window screen.
I can't imagine if all 5 had hatched!
That would have been crowded!

The video below shows Jay and Daisy fluffing their feathers and walking around in the nest - this is their last day before flying off! 


 This video, below, shows Francine and Alberto taking turns feeding Jay and Daisy.  This was also taken on their last day on the nest.  The parents continued to fly up to and around the nest all day - I assume encouraging the little ones to come out! 

 
You can see two of the unhatched eggs left in
the nest after Jay and Daisy flew off.
Though we can't see Jay and Daisy anywhere, I'm sure they are close by.  We had another Finch nest last year and I was able to watch them leave the nest.  Those babies stayed in a close by bush until they were brave enough for another flight.  Their mother continued to bring them food all day in their new perches.  Such a good mother! I'm sure Francine is doing the same thing.

As soon as I have the chance I'll be moving the Finch family's nest.  I've read that as long as it is there they will come back and lay new eggs - even in the same season.  We have had a lot of fun spying on this family, but it's time to plant my Hens & Chicks (the plant - don't be confused with more birds!) before it dries out in the plastic pot I bought it in.

Monday, June 10, 2013

12 Days Old!

Tamara Nugteren


Well, Daisy and Jay are 12 days old.

They are still fed often by Francine and Alberto (AKA Mom and Dad) and have yet to see beyond the edge of their nest.  But they will soon.  The website wild-bird-watching.com says that a House Finch will leave the nest 11-19 days after hatching.  I guess it depends on how comfortable the nest is!  Since there are only two birdies in their nest, they are not a bit crowded and they don't look like they are in a big hurry to leave. But it is getting a bit nasty around the edges.

We were gone over the weekend, but look how much they have changed in just a couple of days! The last photo was taken only 3 days ago.  This picture is from a few hours ago.  Notice the difference in their feathers.  Amazing, right?

In case you can't tell what you are looking at:
One bird is facing the bottom left corner of the photo
(you can see it's beak) and the other bird is facing
the top right corner of the photo (you can see it's tail feathers).  

Friday, June 7, 2013

Feathers and a cute little turtle.

Tamara Nugteren


Jay and Daisy are starting to get their feathers in - which to our eyes means they are finally getting a little cuter.  If you look closely you can actually see the quills (or, if you were holding a leaf, the equivalent of the stem).  They will keep getting fluffier every day now.


While my husband was mowing the other day, he found this cute little guy walking in the grass. It's a tiny painted turtle - probably making its way to the water after hatching. He is about the size of a silver dollar, but will grow to about 6-7 inches across.


Tuesday, June 4, 2013

The final count is in.

Tamara Nugteren


We are getting a minor in "Finch" this Spring. It's really fun to watch and interesting as well!
But, not everything in nature is as rosy as a Disney film.  After much expectation, it looks as if only 2 of the five eggs will hatch.  Apparently, it is common for some of the eggs to go unfertilized (now I'm curious how that happens, but I think I'll let you Google that on your own...).  When that happens, eventually the mama will throw them out. We'll see.

Since the kids could not agree on bird names, I've decided to call them Jay and Daisy in honor of The Great Gatsby.*  Jay and Daisy are one week old today.

Here is the latest photo.  They are really growing, and they are slightly more attractive.  A few more feathers really help! They are sleeping whenever I check on them, but I'll continue to try to get a picture of them with there big eyes open.


Jay and Daisy taking a nap.


Here are a few House Finch factoids for you:

From www.allaboutbirds.org
"House Finches eat almost exclusively plant materials, including seeds, buds and fruits. Wild foods include wild mustard seeds, knotweed, thistle, mulberry, poison oak, cactus, and many other species. In orchards, House Finches eat cherries, apricots, peaches, pears, plums, strawberries, blackberries, and figs. At feeders they eat black oil sunflower over the larger, striped sunflower seeds, millet, and milo."

From www.birdweb.org/birdweb/bird/house_finch (This one really shows how team parenting is important!)
The female incubates 4 to 5 eggs for 13 to 14 days while the male brings her food. The female broods the young for the first few days after they hatch, and the male continues to bring food. The female then joins the male in bringing food to the young. The young leave the nest after 12 to 15 days and may be fed by the male for about two more weeks, while the female starts a second clutch. Pairs may raise three or more broods each season.

If you or your children want to hear the finch songs and calls, check out this link:
http://www.allaboutbirds.org/guide/House_Finch/sounds

Last, if you haven't seen the video I took of Jay just after he hatched "singing", make sure to check it out here.  It seems as if not everyone was able to view it on my blog. Best with sound.  Enjoy!


* You really need to see The Great Gatsby, if you haven't yet.  If for no other reason, because it has Leo in it. ;-)